


Hi, I’m Jessica, and I’m the Food Artist, Stylist, and Founder of Luxe and the Lady. I’m a fan of fluffy animals, cute characters (especially Sanrio), and all things food! On my blog, I create a mix of sweets and healthy treats that are as fun to look at, as they are delicious. Life is too short for boring food! You can find even more cute creations and recipes on luxeandthelady.com and on my Instagram @luxeandthelady.
Pie is one of my most favorite desserts in the world, and since it’s National Blueberry Pie Day I thought we’d celebrate with a pastry that’s as precious as it is delicious! This stellar design was inspired by the mischievous little penguin Badtz-Maru and his signature shapes and shades of lavender and blue. Since we start with refrigerated piecrust, there’s more time to focus on the decorations, which are easily recreated using cookie cutters and the included template. Grab a friend, and get ready to bake your day a little happier!
Badtz-Maru Blueberry Pie
Makes 1 9-inch pie
Ingredients
Blueberry Pie:
- 4 refrigerated piecrusts (2 14 oz. packages)
- 6 cups blueberries (about 3 pints)
- ¾ cup granulated sugar
- 3 tablespoons cornstarch
- 2 tablespoons all purpose flour (or 1 tablespoon cornstarch)
- 1 tablespoon lemon juice
- Zest of half a lemon
- ¼ teaspoon ground cinnamon
- 2 tablespoons unsalted butter
Egg Wash:
- 1 large egg
- 1 tablespoon water
Badtz-Maru Pie Decorations:
- Blue, purple, and yellow icing gel colors (I used teal, violet, sky blue, and lemon yellow)
- 1 teaspoon black cocoa powder
- Egg wash
- 2 tablespoons dark chocolate chips
- 1/8 teaspoon coconut oil
- Granulated sugar (optional, for sprinkling on the crust)
Tools
- 9-inch pie dish
- Badtz-Maru template (sized to about 4.5 inches wide)
- 1 piece card stock
- Parchment paper
- Star cookie cutters in different sizes
- XO cookie cutters (I used 1.7” cutters)
- Pastry brush (or clean paper towel)
- Rolling pin
- Sharp kitchen knife or clean xacto knife
- Toothpicks
- Waxed paper
Helpful Tips:
- It is easiest to read all of the directions once through, before beginning, as some parts of the recipe will need to set or chill while you work on other things.
- If you don’t have any flour available, replace it with 1 extra tablespoon cornstarch.
- Add a tiny bit of pink icing gel to the purple piecrust to make it more lavender.
- Piecrust is easiest to work with when it is very cold, so if it starts to tear or become sticky return it to the refrigerator for 10-15 minutes and then continue working.
- Rolling the piecrust out between 2 pieces of parchment paper prevents the need for extra flour and keeps the dough from sticking to your table.
- Brushing the bottom piecrust before baking helps to prevent a soggy bottom.
Method
1. Divide a disk of dough in half, and color each half with either blue or purple icing gel. Knead the color in just until it’s starting to blend (it’s ok to have some marbling).

2. Roll each color out, between 2 pieces of parchment paper, to about 1/8 inch thick. Use your star and XO cookie cutters to cut out as many shapes as you can. Transfer the cutouts to a parchment lined baking sheets, and gather any scraps to refrigerate and roll out again. Continue until you’ve cut out as many shapes as you can from the colored pieces of dough.

3. Roll a second disk of piecrust out into a 12-inch round, and once again, use your cookie cutters to cut out as many shapes as you can.
4. I like to keep the piecrust shapes in the freezer while working on the pie, but you can also chill them in the refrigerator.
5. You want to bake the pie in the lower third of the oven to make sure the bottom crust gets baked through. Move any oven racks as needed, and preheat the oven to 400°F.
6. Roll a third disk of dough out into a 12-inch round, and transfer it to your pie dish. Press firmly into the bottom and up the sides of the dish. Tuck any excess pie dough under along the edge. Transfer to the refrigerator while the oven warms up.

7. In a large mixing bowl gently combine the blueberries, sugar, cornstarch, flour, lemon juice and zest.
8. Make the egg wash by whisking together the egg white and water and brush over the bottom of the piecrust.
9. Use a slotted spoon to transfer the mixture into your prepared pie dish. Cut the butter into tiny pieces and dot over the top.
10. Add more egg wash to the border of your piecrust and use the chilled star shapes to create a design around the edge (using more egg wash, as needed, to get the shapes to stick). Brush with egg wash. Reserve the extra cutouts to bake after the pie is done (store in the fridge/freezer).

11. Transfer the pie to a baking sheet (to catch any possible drips), and bake for 15 minutes. Then add a ring of foil to protect the crust design from browning too much. Transfer back to the oven, reduce the temp to 350°F, and continue to bake 45-55 minutes more, or until the filling is thick and bubbling.
12. Transfer the pie to a cooling rack to cool completely while working on the Badtz-Maru decorations (keep the oven at 350°F).
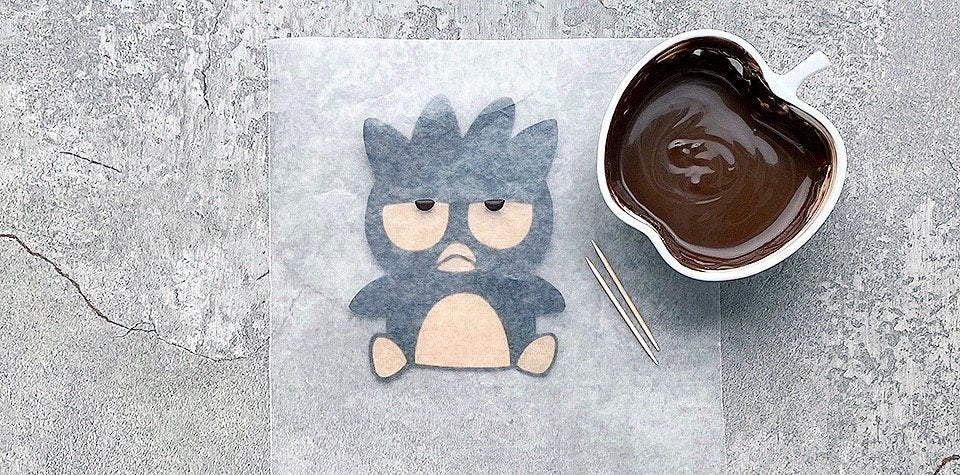
13. Print the Badtz-Maru template out onto card stock, and cut it out.
14. Divide the last disk of dough in half, and color half of the dough with the teaspoon of black cocoa powder. Divide the second half in half again. Add yellow coloring to half of it, and keep the other half uncolored.
15. Roll all of the pieces of dough out to 1/8-inch thickness. Use the template to cut Badtz-Maru’s shape out, and transfer to a parchment lined baking sheet. Continue to use the template to cut Badtz-Maru’s eyes and stomach designs from the uncolored dough, and his feet and beak from the yellow.

16. Use a little egg wash to stick the white and yellow piecrust designs on top of the Badtz-Maru cutout. Transfer the cutouts to the freezer (along with the XO cutouts and any leftover stars) to chill for 15 minutes. Then brush them with egg wash, sprinkle with sugar (I used the sugar on the stars only), and bake for 9-10 minutes (on the middle oven rack this time). The Badtz-Maru shape may take another 5-8 minutes to fully bake after the other shapes are done.

17. Transfer all piecrust shapes to a cooling rack to cool completely.
18. Place the chocolate chips and coconut oil in a heatproof bowl. Microwave in 30-second intervals at 50% power. Stir, and continue to heat until smooth.
19. Use a toothpick dipped in the melted chocolate to draw Badtz-Maru’s eyes onto wax paper (you can use the template underneath as a guide). Allow the pieces to set. Use a little more melted chocolate to transfer the eyes to your cooled Badtz-Maru cutout.
20. Arrange the piecrust cutouts however you would like, on top of the cooled pie, add your Badtz-Maru, and enjoy!
Tip: Everything taste better à la mode! When serving, add a scoop of your favorite vanilla ice cream.
Please note: Sanrio has invited, but does not necessarily endorse, the comments of this guest blogger. The contents of this blog are the copyrighted works of the guest blogger, except that Hello Kitty and other Sanrio characters remain the sole intellectual property of Sanrio, and are used with permission from Sanrio. Any ideas or instructions for homemade products featuring Hello Kitty or other Sanrio characters are authorized for personal use only. A separate license from Sanrio is always required to sell or distribute any products featuring Hello Kitty or other Sanrio characters.