


June 18th is International Sushi Day, and I can’t think of a better way to celebrate than with an ultra-cute, ultra-yummy Hello Kitty sushi party! This sushi platter consists of the following irresistible Hello Kitty sushi treats:
- Classic Hello Kitty Sushi Rolls
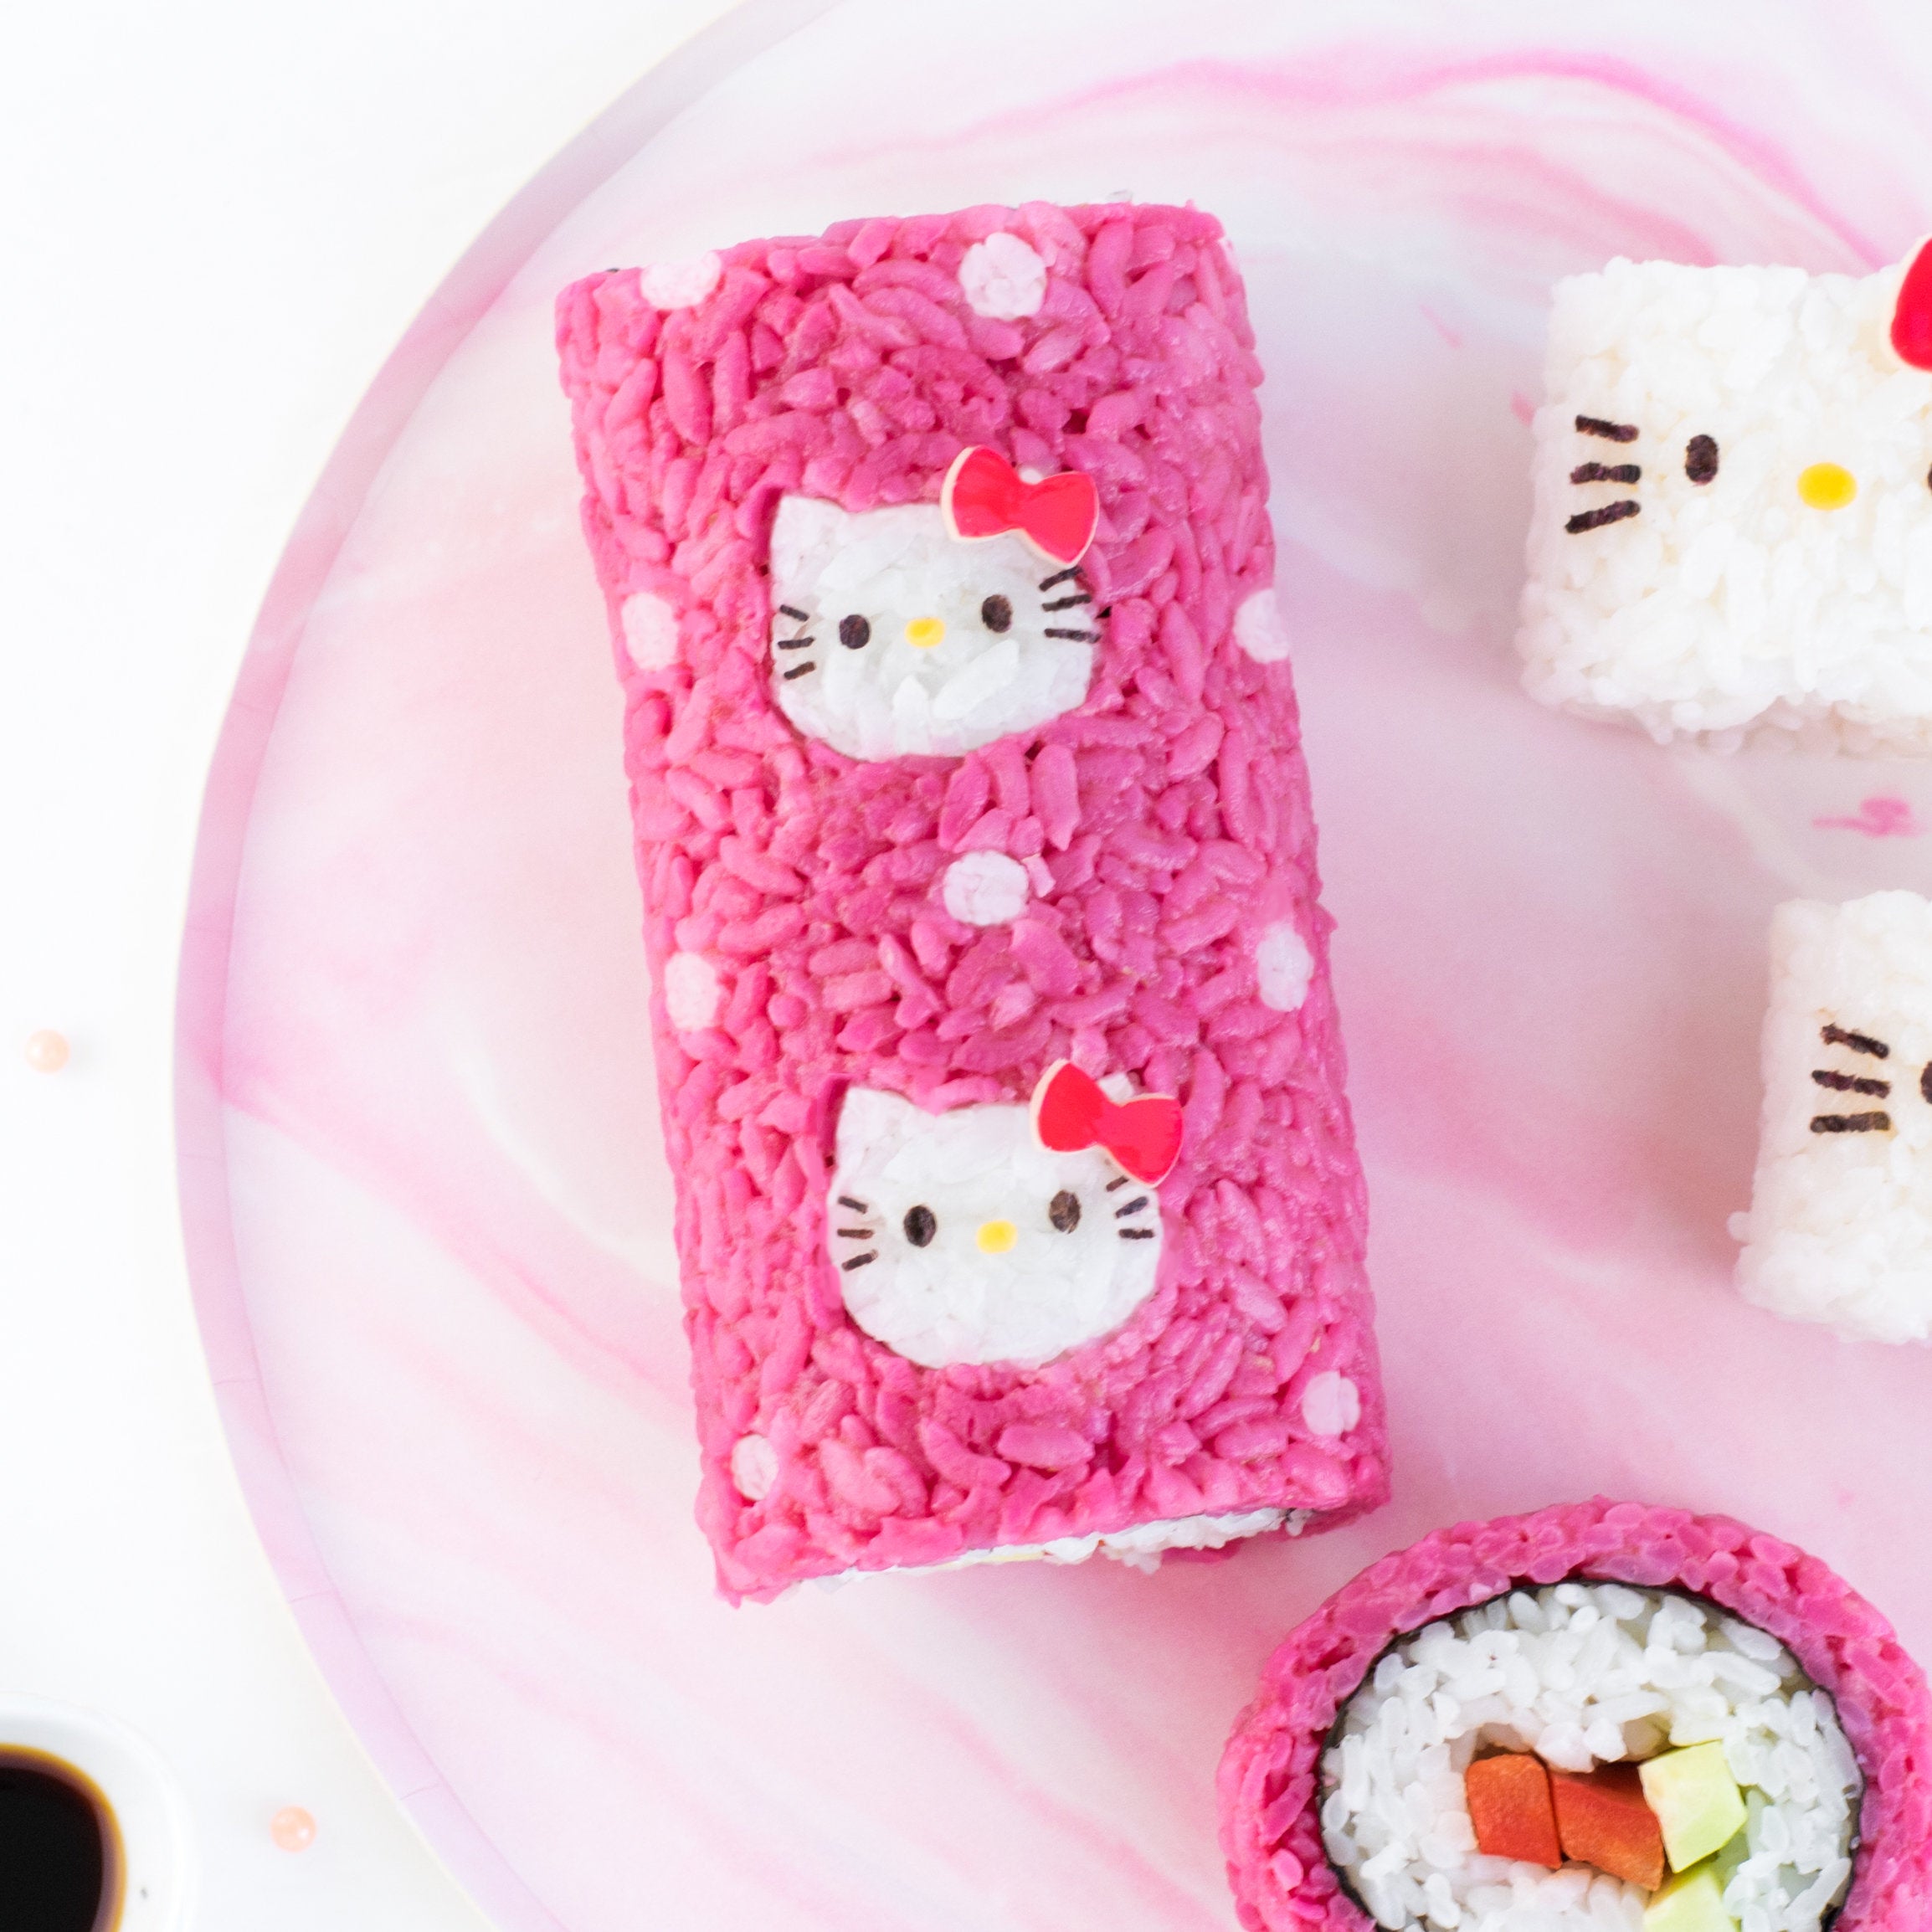
- Pink Hello Kitty Sushi Rolls
- Hello Kitty Shrimp Nigiri Sushi
- Hello Kitty Tamagoyaki Nigiri Sushi
- Hello Kitty Inari Sushi
For even more Hello Kitty bento box ideas, be sure to check out my blog, Love At First Bento, or follow my food art adventures on Instagram!
Ingredients
Food Items:
- Warm, fully cooked sushi rice
- Nori seaweed
- 2 – 3 white cheese slices
- 1 – 2 orange cheese slices
- Red edible food marker
- Black edible food marker
- 1/4 teaspoon beet powder
- Your choice of sushi fillings (I used imitation crab + cucumber + bell pepper)
- Your choice of sashimi cuts (I used tamagoyaki and shrimp)
- Inari Age (prepared deep-fried tofu pouches)
Recommended Tools:
- Tiny smiley face nori punch
- Hello Kitty food cutter – small size
- Hello Kitty food cutter – large size
- Small bow food cutter
- Large bow food cutter
- Small cat head food cutter
- Circle cutter pen tool
- Extra-tiny circle (or oval) food cutter
- Bamboo sushi rolling mat
- Plastic wrap
- Scissors (sanitized for use with food)
Instructions
Classic Hello Kitty Sushi Rolls

1. Using the Hello Kitty nori punch, punch out the full design from a sheet of nori seaweed, reserving the eyes and whiskers (you can discard the nose). Repeat two more times, so that you have enough to make 3 Hello Kitty sushi rolls.
2. Using the small oval-shaped cutter located on the Hello Kitty food cutter (small size), cut out 3 ovals from the orange cheese – these will become Hello Kitty’s nose.
3. Using the large bow food cutter, cut out 3 bows from the white cheese. Color them red using the edible red food marker, and allow to dry. These will become Hello Kitty’s red bow.
4. Fully wrap your bamboo sushi mat in plastic wrap, then lay it flat so that the slats are horizontal. Take a fresh sheet of nori and carefully rip or cut it in half crosswise. Place one half sheet of nori (shiny side facing DOWN) on top of the sushi mat, and reserve the other nori half for later.
5. Add some white rice on top of the nori (I recommend starting with 1/2 cup of sushi rice). Wet your hands with water and gently spread the rice until it evenly covers the entire sheet of nori, adding more as needed to fill in any gaps.
6. With wet hands, carefully pick up the nori and flip it over so that the rice side is facing down. Aim to place the nori near the bottom edge of the bamboo mat. Place your fillings near the bottom-middle end of the nori, making sure to keep them tight together and horizontally aligned.
7. Grab the part of the sushi mat that’s closest to you and begin to roll your sushi away from you, keeping the fillings in place with your fingers. Aim to cover your fillings with the first roll, then continue rolling until there’s no nori left, using the bamboo mat to tighten and shape the roll along the way. TIP: Adding a little bit of water along the vacant edge of nori at the end of your roll will help things stick together better.
8. With a sharp, wet knife, cut your sushi roll into 3 pieces. To ensure clean cuts, re-wet the knife in between each cut by wiping it clean on a damp towel.
9. Using tweezers, apply the Hello Kitty nori facial features (eyes + whiskers) to the front of one sushi roll. Next, place the orange cheese nose in between the two eyes. Finally, place the colored cheese bow near the top right edge of the sushi roll. TIP: Use a bit of honey or mayo to help the cheese pieces stick on better. Repeat this step on the remaining sushi rolls, so you end up with 3 Hello Kitty sushi rolls.
10. Optional: If desired, repeat all of the above steps with the remaining half sheet of nori to create three more Classic Hello Kitty sushi rolls.
Pink Hello Kitty Sushi Rolls
1. Using the tiny smiley face nori punch, punch out the full design from the nori seaweed, reserving the eyes and eyebrows (the eyebrows will become Hello Kitty’s whiskers). Repeat until you have a total of 4 eyes, and 12 eyebrows – this will be enough to make 2 Hello Kitty faces.
2. Using the extra-tiny circle food cutter, cut out 2 circles from the orange cheese – these will become Hello Kitty’s nose.
3. Using the small bow food cutter, cut out 2 bows from the white cheese. Color them red using the edible red food marker, and allow to dry. These will become Hello Kitty’s red bow.
4. Pink Rice: Transfer about 1/2 cup’s worth of prepared sushi rice to a small bowl. In a separate small dish, combine 1/2 – 1 tablespoon of warm water with beet powder and mix until dissolved. Add your homemade pink dye to your bowl of rice and mix until evenly colored. Feel free to add more beet powder until desired pink color is achieved.
5. Spread a sheet of plastic wrap atop your work surface. With clean, wet hands, spread about 1/4 cup’s worth of white sushi rice evenly atop the plastic wrap. Your goal is to make the rice as flat and compact as possible. Take the small cat head food cutter, and carefully cut out 2 cat heads from the white rice. Optional: Using the circle cutter pen tool (small end), cut out as many white circles from the rice as you’d like. Discard the excess rice, and carefully reserve your rice shapes.
6. Take a fresh sheet of nori and carefully rip or cut it in half crosswise. Place one half sheet of nori onto your work surface, then carefully spread a new, clean sheet of plastic wrap over top of it. Using the nori as a guide, spread the pink rice over the plastic wrap until it fully covers the nori rectangle. Your goal is to make the rice as flat and compact as possible, all while matching the shape of the nori.
7. Take the small cat head food cutter and carefully cut out 2 cat heads from the pink rice. You can cut them out wherever you’d like, but I recommend making a straight line across the middle (see photo). Remove the pink cat heads and insert the white rice cat heads. Optional: If you prepared white rice polka-dots, use the circle cutter pen tool (small end) to cut out as many circles as you have white rice polka-dots, then remove the pink circles and replace them with the white rice circles. The polka-dots can be placed in a random fashion along the middle of your pink rice rectangle.
8. Carefully slide out the nori rectangle from underneath the plastic wrap and place it atop the rice so it sticks. Then, carefully slide your bamboo sushi rolling mat underneath the plastic wrap, with slats horizontally aligned.
9. Add some white rice on top of the nori (I recommend starting with about 1/2 cup of sushi rice). Wet your hands with water and gently spread the rice until it evenly covers the entire sheet of nori, leaving a 1-inch space of uncovered nori at the end furthest from you.
10. Place your fillings near the bottom-middle end of the nori, making sure to keep them tight together and horizontally aligned.
11. Grab the part of the sushi mat that’s closest to you and begin to roll your sushi away from you, keeping the fillings in place with your fingers. Aim to cover your fillings with the first roll, then continue rolling until there’s no nori left, using the bamboo mat to tighten and shape the roll along the way. TIP: Adding a little bit of water along the vacant edge of nori at the end of your roll will help things stick together better.
12. With a sharp, wet knife, cut your sushi roll into 2 pieces. To ensure clean cuts, re-wet the knife in between each cut by wiping it clean on a damp towel.
13. Using tweezers, apply the Hello Kitty nori facial features (eyes + whiskers) onto the two white cat heads. Next, place the orange cheese noses in between the two eyes. Finally, place the colored cheese bows underneath the right ears. TIP: Use a bit of honey or mayo to help the cheese pieces stick on better.
14. Optional: If desired, repeat all of the above steps with the remaining half sheet of nori to create two more pink Hello Kitty sushi rolls.
Hello Kitty Nigiri Sushi

1. Using the Hello Kitty nori punch, punch out the full design from a sheet of nori seaweed, reserving the eyes and whiskers (you can discard the nose).
2. Using the small oval-shaped cutter located on the Hello Kitty food cutter (small size), cut out an oval from the orange cheese – this will become Hello Kitty’s nose.
3. Using the small bow food cutter, cut out a bow from the white cheese. Color it red using the edible red food marker and allow to dry. This will become Hello Kitty’s red bow.
4. Using the circle cutter pen tool (large end), cut out 2 circles from the white cheese – these will become Hello Kitty’s paws.
5. Using a clean pair of scissors, cut out a small rectangular strip of nori seaweed (around 7 cm long).
6. Spread a clean sheet of plastic wrap atop your work surface, and place about 1/8 cup of prepared sushi rice on top of it. Fully wrap the rice in the plastic wrap, then use your hands to mold it into a small, rounded rectangle shape.
7. Take your chosen sashimi cut (eg: shrimp) and place the white rice rectangle on top of it. Wrap the rectangular nori strip around the middle, so that the rice and your chosen ingredient stay stuck together.
8. Using tweezers, apply the Hello Kitty nori facial features (eyes + whiskers) to the top of the rice rectangle. Next, place the orange cheese nose in between the two eyes, followed by the colored cheese bow near the top right corner of the rice rectangle. Finally, place the two white cheese paws on top of the nori seaweed strip, so that it looks like Hello Kitty is holding onto it. TIP: Use a bit of honey or mayo to help the cheese pieces stick on better.
9. Optional: If you’d like to make more Hello Kitty nigiri sushi, repeat all of the above steps.
Hello Kitty Inari Sushi

1. Using the Hello Kitty nori punch, punch out the full design from a sheet of nori seaweed, reserving only the whiskers (you can discard the remaining pieces).
2. Using the small circle-shaped cutter located on the Hello Kitty food cutter (large size), cut out two circles from the white cheese, then color black using the black edible food marker. These will become Hello Kitty’s eyes.
3. Using the small oval-shaped cutter located on the Hello Kitty food cutter (large size), cut out an oval from the orange cheese – this will become Hello Kitty’s nose.
4. Using the bow cutter on the Hello Kitty food cutter (small size), cut out a bow from the white cheese. Color it red using the edible red food marker, and allow to dry. This will become Hello Kitty’s red bow.
5. Carefully fill the inari age (tofu pouch) with prepared sushi rice. Lightly flatten the top down using the back of a rice paddle or spoon.
6. Using tweezers, apply the Hello Kitty facial features (eyes, nose, and whiskers) onto the surface of your inari sushi. Place the colored cheese bow near the top right edge of the inari sushi. TIP: Use a bit of honey or mayo to help the cheese pieces stick on better.
7. Optional: If you’d like to make more Hello Kitty inari sushi, repeat all of the above steps.
Please note: Sanrio has invited, but does not necessarily endorse, the comments of this guest blogger. The contents of this blog are the copyrighted works of the guest blogger, except that Hello Kitty and other Sanrio characters remain the sole intellectual property of Sanrio, and are used with permission from Sanrio. Any ideas or instructions for homemade products featuring Hello Kitty or other Sanrio characters are authorized for personal use only. A separate license from Sanrio is always required to sell or distribute any products featuring Hello Kitty or other Sanrio characters.